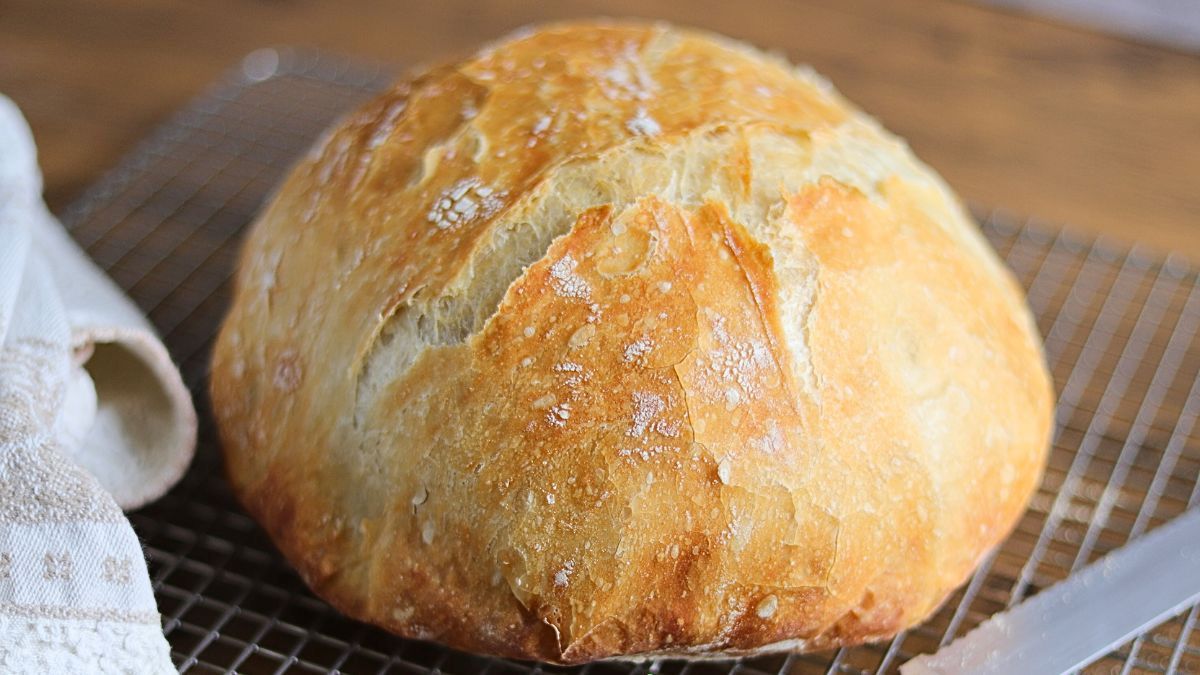
Do you want to know how to make the best delicious homemade bread? This is one of my go-to recipes for authentic, Tuscan style bread.
It’s as easy as mixing the dough and letting it rest overnight. Then, in the morning, pop it in the oven and bake.
Does this sound like something you’d like to make?
Roll up your sleeves and lets bake together!
All you need are a few simple ingredients such as flour, instant yeast, salt and water, and you will be able to create the most amazing and mouthwatering homemade bread ever.
This bread never lasts longer than a day (if that) in our house!
In this Post: Everything You Need To make The Best Delicious Homemade Bread
- Ingredients you will need
- Equipment you will need
- All about yeast
- How to make this recipe
- Variations to try
- Frequently Asked Questions
- Rebecca’s Tips for success
- Jump To Recipe
Just a little back story…Years ago, we were at one of our favorite Italian restaurants and they delivered the bread to the table.
It tasted so good I could not stop with just one slice. Dipped in extra virgin olive oil mixed with Parmigiana Reggiano and herbs, it was pure heaven!
It was the most incredibly chewy, crusty, delicious homemade bread ever. You know, the type that makes your mouth water with anticipation for the next bite of absolute goodness? Consequently, we ended up asking for more bread which was just as good as the first basket.
This is exactly the type of bread you will be able to make. In fact, after tasting this recipe for the first time, my husband declared it tasting “just like his Nonna’s bread from Italy!”
So, let’s get right to making this delicious homemade bread!
The great thing about this recipe for homemade bread, is that it uses very simple ingredients that most people already have in their pantry. Another plus is that most of the prep is hands-off, as the dough “proofs” overnight as you sleep. It doesn’t get much easier than that!
Ingredients you will need:
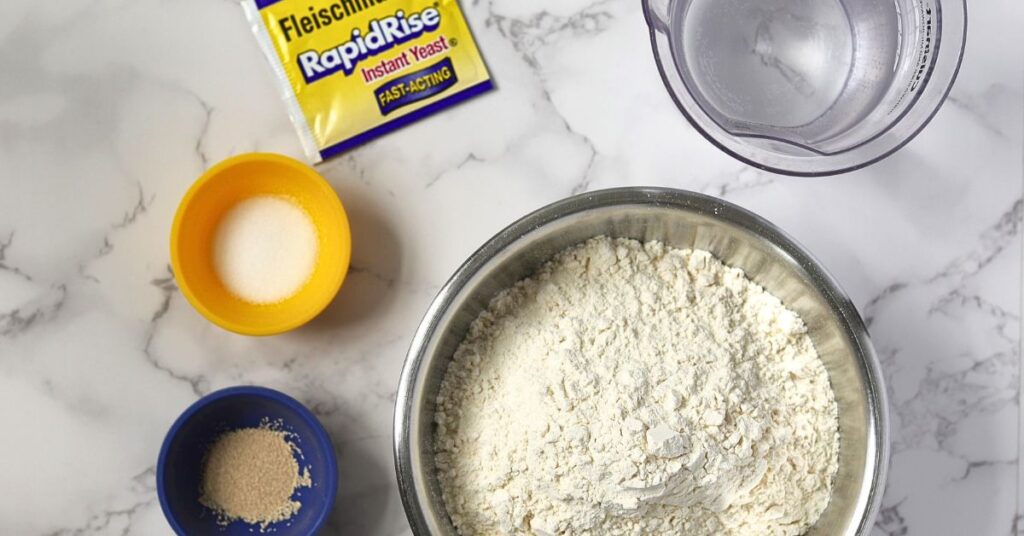
- All-Purpose Flour
- Rapid Rise Yeast (also known as instant or quick-rise yeast)
- Salt – plain table salt, not Kosher salt
- Water – tap water
- Cornmeal (for preventing dough from sticking when resting) not shown in photo
Equipment you will need:
- Cast iron enameled Dutch oven (preferably) or any heavy bottomed oven safe pot with cover
- Liquid measuring cup
- Large bowl
- Rubber spatula
- Parchment paper
- Large cutting board
- Bench scraper
- Kitchen towel
All About Yeast:
Did you know that the most common yeast used by bakers is called Baker’s Yeast (scientific name: Saccharomyces cerevisiae)? This makes sense, right?
This type of yeast comes in various forms including instant / rapid rise, fresh (compressed), in addition to the most common type, active dry yeast.
You can use them in commonly baked products like bread, rolls, pizza dough, as well as other yeast-raised baked goods.
The following are the most commonly used:
- Active Dry Yeast – Active dry yeast is a form of dry yeast. You need to be proof it in warm water (usually around 110°F or 43°C) before adding to the dough. This process allows the yeast to activate and start fermenting. This type of yeast has larger granules compared to instant yeast.
- Instant / Rapid Rise Yeast – Instant yeast is a type of dry yeast that doesn’t require proofing before used in recipes. You can add directly to the dry ingredients, making it more convenient for bakers. Instant yeast typically has smaller granules than active dry yeast and may provide faster fermentation. This is the type I use in this bread recipe.
- Cake Yeast (Fresh Yeast) – Cake yeast, also known as fresh yeast or compressed yeast, is a moist form of yeast often used by commercial bakers. Because it has a shorter shelf life than dry yeast, it therefore needs to be refrigerated or frozen. You need to dissolve this type of yeast in liquid before adding to the dough.
How to make Homemade Bread:
First:
- Gather your Ingredients. Flour, salt, rapid-rise yeast, and water. This is an important point often overlooked, and should be part of any prep for a recipe so you don’t get half-way through and discover you don’t have a essential item. Learn about the term Mise En Place here to make cooking more efficient!
Next:
- Mix together the flour, salt, instant yeast in a large bowl, and then add water and mix gently.
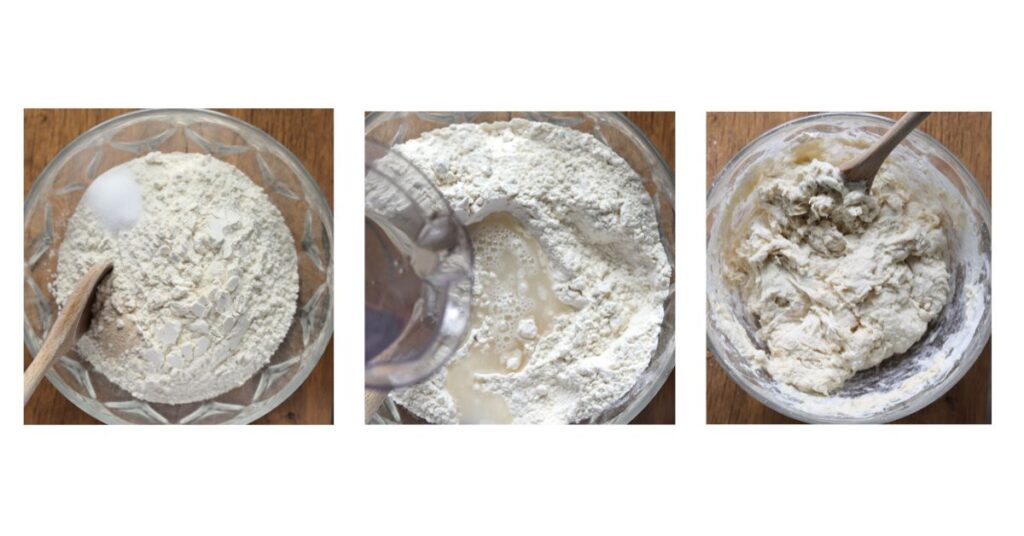
- Stir together to make a shaggy looking dough.
Then:
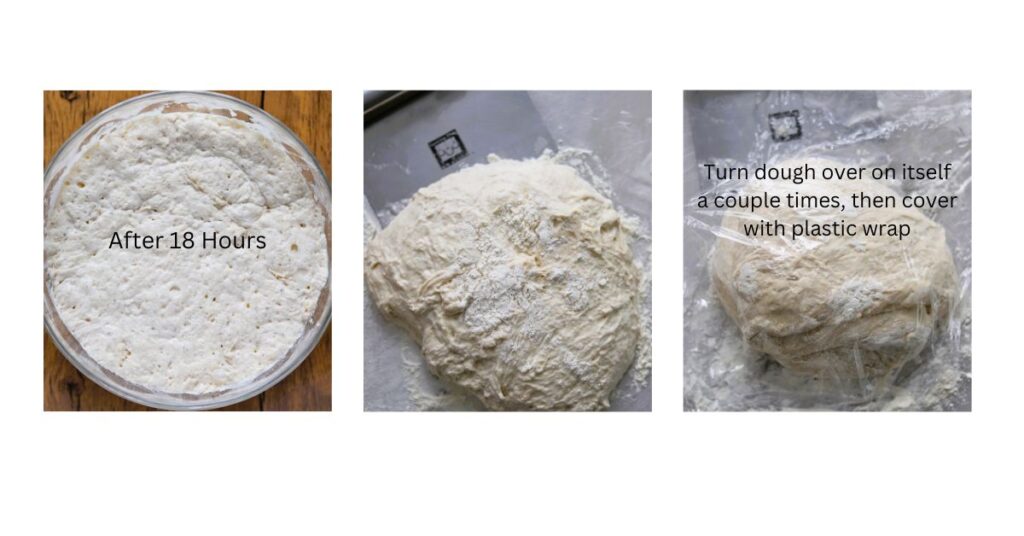
- At this point, all you need to do is cover with plastic wrap and let dough rise overnight 18 hours. This is the most important part. As a result, the long ferment stage gives the bread its delicious flavor and chewy texture.
The next day:
- Dump out dough onto floured surface, sprinkle some flour on top of dough, and turn over on itself a couple times, cover with plastic wrap and let rest 15 minutes.
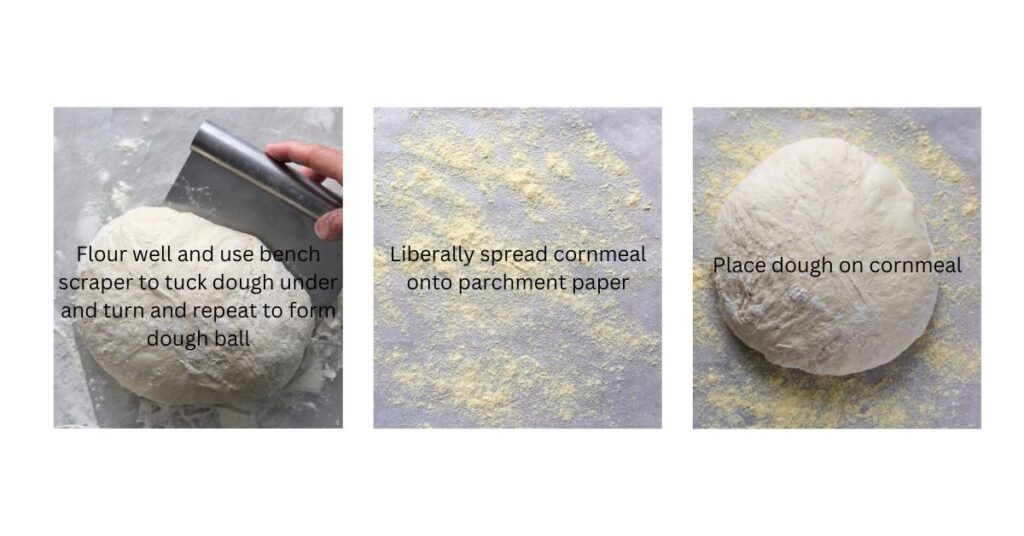
- Shape dough into a smooth ball and place onto parchment dusted with cornmeal
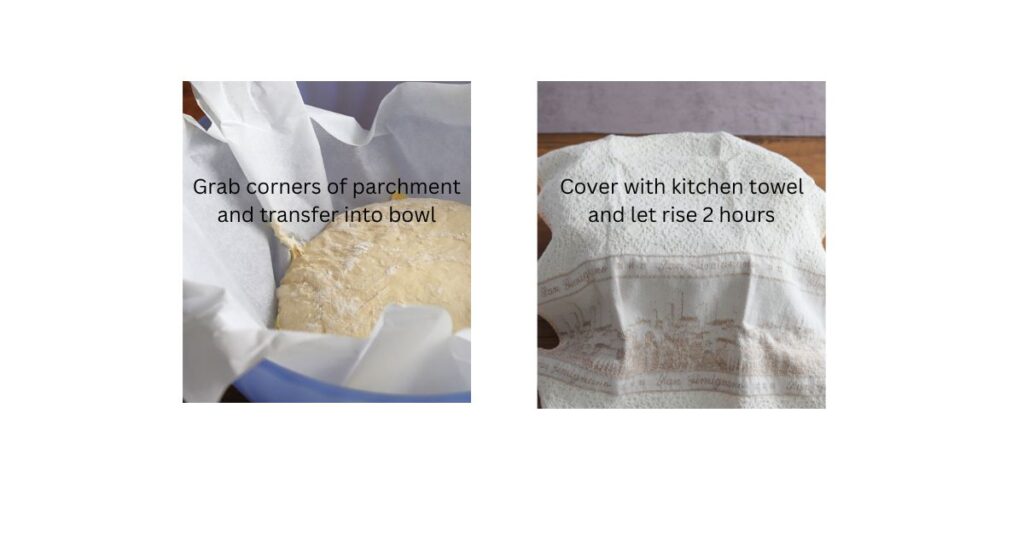
- Let rise again for 2 hours
- Set timer (see option in recipe card) for 90 minutes. When time is up, place empty Dutch Oven (with lid on) in oven and set temperature for 450 deg. F
- Set timer for 30 minutes. When time is up, use potholders to carefully remove pan from oven, set on heatproof surface.
- Transfer dough along with parchment into Dutch Oven, Cover and Bake in preheated oven for 30 min.
- After 30 minutes, remove lid and continue to bake for 15 additional minutes.
After bread is done baking:
- Remove from oven and let rest (the hardest part of all!!) 30-60 min. This is the final masterpiece!
Finally:
- Slice and enjoy, dipped into Extra-virgin olive oil, grated cheese and mixed herbs! Yum!
When to start the homemade bread:
You can begin this recipe in the afternoon, let it work hard all night as you sleep, and in the morning it will be ready to be shaped and then baked.
It is as easy as that. And in just a couple more hours you will have freshly baked, mouth-watering delicious homemade bread, not to mention, bragging rights to the best tasting bread!!
Start & Finish Times:
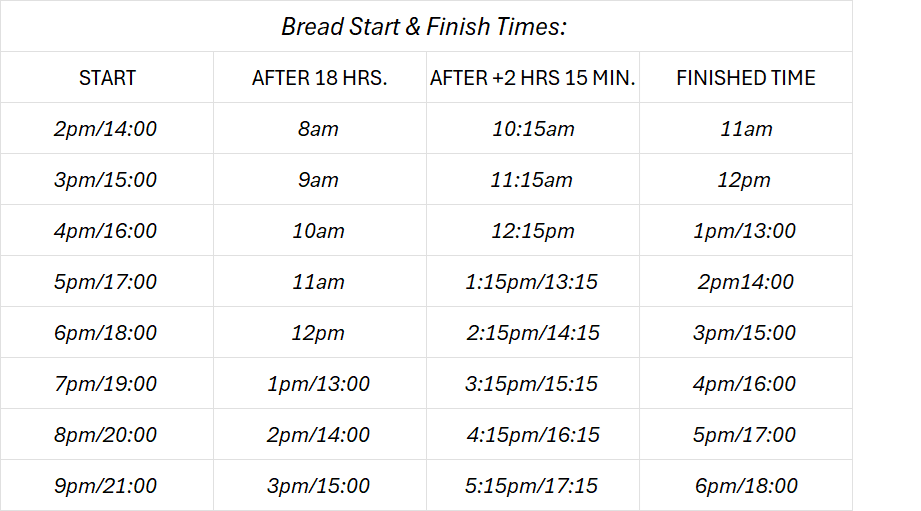
For example:
- If you want your bread to be done by 12pm the following day, you should start mixing your dough at 3pm/15:00.
- After 18 hours fermenting, the time would be 9am,
- After another 2 hrs. 15 min. resting, the time would be 11:15am
- And finally, the bread would be ready and out of the oven around 12pm.
*Please Note: These times are approximate and do not take into account the time it takes to form the dough ball.
Variations:
- Use 1/2 cup White Whole Wheat flour and 2 1/2 cups All Purpose flour, in place of all All Purpose flour for some added nutritional value
- Try adding grated Parmigiana Reggiano & Kalamata Olives (drained)
- Or try adding dried cranberries and pecans
- Or nuts/seeds…get creative and add what you like!
*** Very Important: When mixing in add-ins, you should mix them with the dry ingredients in the beginning. Otherwise, you will have a difficult time adding them into the dough if you wait until the dough is formed.
Frequently Asked Questions:
How do you know when the homemade bread is done?
When done baking, homemade bread will sound hollow when tapped on the bottom, which suggests that it is fully baked. The internal temperature should register between 190-200 deg. F (88-93 deg. C) when thermometer is inserted into the center of the loaf.
How do you store the homemade bread to keep it fresh?
It is most important to store homemade bread in a paper bag or bread box at room temperature for up to 2 days. If you store sealed, the crust will soften.
How can you add flavor to homemade bread?
You can add flavor to homemade bread by adding herbs, spices, cheese, dried fruits, nuts, seeds, or grains into the dough. You can also brush the crust with melted butter or olive oil and sprinkle it with sea salt or herbs before baking for added flavor.
Can you freeze homemade bread?
Yes, homemade bread freezes well. Allow it to cool completely, then wrap it tightly in plastic wrap and aluminum foil or place it in a freezer bag. Frozen bread can be stored for up to 3 months. Thaw it at room temperature or in the refrigerator before reheating.
How do you refresh bread that has lost its crisp crust?
If you want to re-crisp the crust, simply place the loaf on the rack in the oven for about 15 min. at 350 ℉ or appx. 177 ℃.
Are you looking for something to serve with your Best Delicious Homemade Bread? Try my Best Chicken Marsala recipe!
Rebecca’s Tips for Success:
- Use a Dutch Oven. No-knead bread benefits greatly from baking in a covered Dutch oven. The closed environment traps steam, which helps create a crispy crust.
- Be patient and let your dough ferment. You will want to let the dough rest for 18 hours. This slow fermentation allows the dough to develop complex flavors and a chewy texture. If you want the best delicious homemade bread to be ready late morning, start mixing your ingredients late afternoon. See chart above for guidelines.
- Make sure you generously flour the cutting board and the bench scraper (that you will use to help shape your dough ball). The dough is very sticky and the flour will help prevent the scraper from sticking to the dough – it will be much easier to work with.
- Handle the Dough Gently. Since you’re not kneading the dough, it’s important to handle it gently to avoid deflating it. Use a light touch when shaping the dough into a ball or transferring it to the Dutch oven.
- Experiment with Flavors. Once you’ve mastered the basic no-knead bread recipe, don’t be afraid to experiment with different flavors. Add herbs, spices, cheese, nuts, or dried fruits to customize your loaf and create unique variations.
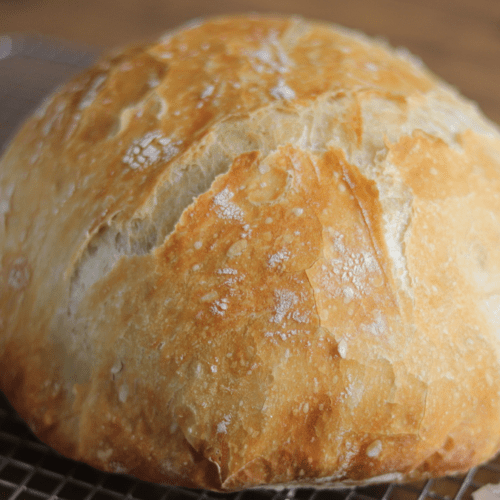
How To Make The Best Delicious Homemade Bread
Equipment
- 1 Dutch Oven - * If you don't have a Dutch Oven, any oven-proof pot with a lid will work fine.
- 2 Large Bowls - * I find that either glass or metal work the best.
- 1 Bench Scraper
- 1 cup dry measuring cup
- 1 tsp. measuring spoon
- ¼ tsp. measuring spoon
- Parchment paper
- Plastic wrap
- Clean kitchen towel
Ingredients
- 3 cups All-purpose flour (and extra flour while forming dough into ball)
- 1 tsp table salt (not Kosher)
- ¼ tsp rapid rise yeast (also called instant )
- 1 ⅝ cups water
- ¼ cup corn meal (you will spread onto parchment to prevent the dough from sticking )
Instructions
Gather Your Ingredients
- This small step saves a ton of time and allows you to make sure that you have all the necessary ingredients needed to make the recipe.
Mixing
- In a large bowl, add the 3 cups All-purpose flour, 1 tsp table salt (not Kosher) ¼ tsp rapid rise yeast and 1 ⅝ cups water. Stir to combine. * Note: Don't worry if it looks a little shaggy and not well mixed, that's the way it is supposed to be.
- Cover bowl tightly with plastic wrap and place in a location away from drafts.
Dough Resting Time
- Let dough rest for 18 hours without disturbing it. Overnight is best.
- After 18 hours, it will look very wet and bubbly, and will have a strong yeast smell.
Forming The Dough Ball
- Dust cutting board liberally with flour and turn dough out onto cutting board. It will look very wet and unruly, but I promise this is just the way it is!
- Sprinkle the top of the dough with some flour. Take the bench scraper and sprinkle with flour, and use it to lift dough and fold it a couple times onto itself. Sprinkle dough with a little more flour, and cover loosely with the plastic wrap.
- Let rest 15 minutes
- After 15 minutes, remove the plastic wrap and lightly flour the top of the dough. Give it a pat with your hand to disperse flour, then use the bench scraper and your hands to help shape the dough into a smooth ball.To do this, first flour your scraper and then press it onto the cutting board touching the dough and tuck the scraper under and turn. Repeat the process, helping to shape the dough with scraper and hands until smooth ball forms. You may need to keep adding flour to the scraper to prevent the dough from sticking.
- Once your dough ball is formed, sprinkle ¼ cup corn meal onto a sheet of parchment paper (about 14" long) and place dough on top.
- Grab corners of the parchment together with the dough inside and place in a clean bowl. Cover with kitchen towel and let rest 2 hours.
- Set timer for 90 minutes. When timer sounds, place the covered Dutch oven (or other covered pot) into your oven, and set temperature to 450 °F. Reset timer for 30 minutes.
- When timer sounds, use pot holders (it will be extremely hot) to carefully transfer Dutch oven to a heat proof surface
- Carefully, using the potholder, remove lid and set aside on a heatproof surface. I like to keep a potholder on the handle of the lid to remind myself not to grab it so I don't get burned!!
- Next, grabbing at the corners, transfer dough and parchment to the pot and replace cover. Place into the preheated oven set to 450 °F
- Set timer for 30 minutes.
- After 30 minutes, carefully remove cover with potholder, and continue to bake 15 minutes more. (this will let the top of the bread become golden brown and crusty).
- Finally, after the long wait, carefully remove pot from the oven and set on a heatproof surface. You will hear the bread making amazing crackling sounds, and smell the mouth-watering aroma of the best bread you have ever baked!
- Transfer the loaf to a cooling rack and try to wait at least 30 minutesbefore slicing. To transfer, I use a metal spatula to get under loaf and lift it our. Be careful, it's extremely hot.
- Enjoy!
Notes
- You will want to let the dough rest for 18 hours. If you want the best delicious homemade bread to be ready late morning, start mixing your ingredients late afternoon. See above chart for timing.
- If not eating right away, the crust may get softer – If you want to re-crisp the crust, simply place the loaf on the rack in the oven for 15 min. or so at 350 ℉
- Serve with Extra Virgin Olive Oil seasoned with grated Pecorino Romano or Parmigiana Reggiano cheese, and a mixture of herbs of your choosing. I like to add some garlic salt, a shake of hot pepper flakes, garlic powder, onion powder and Italian seasoning. Experiment with what you like best – the options are limitless! A special thank you goes out to Jim Lahey for the original recipe published many years ago. It has brought much happiness to thousands of people and will continue to for many years to come.
- Use my helpful chart for determining Start & Finish times for your bread.
YOUR OWN NOTES
Nutrition
Disclosure
The provided nutritional information should only be used as a general guideline rather than an exact representation of the nutritional content of the prepared dish. Individual nutritional needs and dietary preferences may vary, and we encourage our readers to use their discretion and consult with a qualified healthcare professional or nutritionist for personalized dietary advice.
© 2024, Rebecca’s Best Recipes

